OK, cards on the table: I’m a New Yorker, and I have a very strong attachment to pizza (and bagels too, but that’s another post). So I find myself in Chicago, staying one block from Gino’s East, so I figured it was time to finally try Chicago-style deep dish pizza.
I sat at the bar, and asked the bartender for his recommendation for the best intro to deep-dish pizza for a non-meat-eater. He recommended the O.M.G. pie, which has mushrooms, green peppers, and onions, so I ordered that. They offered a 9″ and 12″ version, and as I was by myself, I got the 9″.
My 9″ OMG pie
AS you can see, the pie came in its own pan, and the first piece was cut out for me. Subsequent pieces (I can’t call them “slices”) required cutting out with the spatula.
I was familiar enough to know that ingredients are upside-down compared to pizza, with “toppings” on the bottom, followed by cheese, and then the tomato sauce. It certainly looked tasty enough! So I dug in.
The first thing that’s odd is that you need a knife and fork to eat it. No self-respecting New Yorker would ever use a knife and fork to eat a pizza. But hey, this is Chicago, not New York, so I embraced that approach. And I must say, it was very tasty: the tomato sauce was fresh and bright, the cheese was rich and stringy, and the veggies were also good. But the crust?
A split-personality meal
It’s very odd: there is little or no crust underneath all the other good things. Instead, it’s all bunched up on the edge. And it isn’t anything like a pizza crust; rather, it’s a dense, cake-like bread. So as best as I could figure out, you eat the sauce/cheese/fillings, and then are left with a bunch of dense bread.
A hunk of dense bread
And the crust itself was good, but man oh man was it filling. I was barely able to finish half the pie. Contrast that with a 9″ thin-crust pie, which leaves room for dessert.
So what can I say? It was enjoyable, but it wasn’t pizza. I’d like to think of it as a tasty bread-based casserole. Now I can’t wait to get back to New York to experience the real thing once more.
A popular way of looking at the effort that someone with a chronic illness must expend to get through the day is Spoon Theory. It came about when the author, who has lupus, was in a restaurant trying to illustrate to her friends how she must ration her efforts to avoid exhaustion. She gathered spoons from nearby tables, gave them to her friend, and asked her to list the activities for a typical day. As her friend recited the activities she would have a spoon taken from her. Once those spoons were used up, any further effort that day would be nearly impossible.
This metaphor for expending limited resources has become very popular in communities for those with such chronic illnesses; some even refer to themselves as “spoonies”. I’ve also heard Spoon Theory applied to introverts, who can be in social situations for a much shorter time than others. I am an introvert, and I guess I could never quite feel that Spoon Theory was an accurate description of what my exhaustion felt like. I’m also a bit too literal at times, so the concept of somehow your spoons getting replenished didn’t seem realistic – is there some spoon delivery service? Spoons also don’t lend themselves to division: how would you spend half a spoon? Yes, I understand that this is all a metaphor, but effective metaphors should have clear connections to the reality they are describing. For it wasn’t just the simple passing of time that recharged me; it was how that time was spent made a huge difference in how quickly I could handle more activity among others.
One day I was hanging up a towel after a shower, and I thought about the cycle of use for a towel. A fresh towel can dry off a person who has just bathed, but there is a limited capacity any towel has for this. Once it has absorbed enough water, it can’t absorb any more. So after drying the person, the towel has to dry itself out. And it isn’t just the passing of time that is needed, but also proper placement of the towel. Leaving the towel balled up on the floor would require a very long time for the towel to fully dry; it would probably get mildewed first! But if you were to hang it up so that air is able to circulate around it, it will be dry much more quickly. And if you hung it on a clothesline outside in the sun on a breezy day, it would be dry in no time at all!
Towels also come in different sizes and materials, both of which affect its capacity to absorb water. The drying task that the towel is used for also affects its usefulness: drying a hand here and there would never saturate it, but being wrapped around someone stepping out of a pool soaking wet would test its limits.
Introverts are like smaller towels that more quickly reach their limit absorbing social interactions. My experience attending tech conferences seems to mirror the cycle of towels. If I’m listening to sessions, with only occasional interactions, I can go all day. If I’m involved in lots of discussion-type sessions, I can’t go nearly as long. If I’m giving a talk, that’s even more draining. And when I’m staffing a booth, where I need to be constantly talking with all sorts of people, I run out of energy much more quickly. For a towel, that would be like being held under a running faucet: it loses its ability to dry very quickly.
How I “hang myself up” also determines how quickly I recover. I can sit in a corner of the conference and work on my laptop, but it’s much better if I can work in my room where there are no other people walking around. And what seems to work best for me is to go outside and walk around: the movement, the fresh air, the different visual scenery – all that helps me feel more energized. The last few years I have made it a practice that, weather permitting, I find a block of time toward the middle of the day, and go outside walking with my camera. Being a photographer, I can often get some good opportunities, no matter where the conference is held. And it seems that focusing my brain on creativity for an hour or so allows me to feel energized and able to immerse myself back into the conference events. It’s like a clothesline in the sun for my towel!
So I hope that Towel Theory does as much to help people understand what the introvert experience is like as Spoon Theory has done to help illustrate the situation of people with chronic illnesses.
It’s been a great run, but my days in the OpenStack world are coming to an end. As some of you know already, I have accepted an offer to work for DataRobot. I only know bits and pieces of what I will be working on there, but one thing’s for sure: it won’t be on OpenStack. And that’s OK with me, as I’ve been working on OpenStack in one form or another for 10 years now.
Wait a moment, you say – OpenStack is only 9 years old! Well, before the OpenStack project was started, I worked on Swift briefly when it was an internal, proprietary project at Rackspace. After that I switched to the Cloud Servers team, which was the team that started Nova with NASA. So yeah, it’s been a full decade. That’s a loooonnnnggg time to be on any development project!
So the feelings of burnout combined with the shift away from OpenStack within IBM made moving to DataRobot a very attractive option. And after having done several video interviews with the people there and getting their impression of life at DataRobot, I’m that much more excited to be joining that team. I’m sure that for the first few months it will be like drinking from the proverbial fire hose, and that’s perfectly fine by me. It’s been much too long since I’ve pushed the reset button for my career.
Over these past 10 years I have made many professional contacts, some of whom I consider true friends. I will miss the OpenStack community, and I hope to run into many of you at future tech events – PyCon, anyone?
OK, so the title of this is a bit clickbait-y, but let me explain. By some measures, OpenStack is a tremendous success, being used to power several public clouds and many well-known businesses. But it has failed to become a powerful player in the cloud space, and I believe the reason is not technical in nature, but a lack of leadership.
OpenStack began as a collaboration between Rackspace, a commercial, for-profit business, and a consulting group working for NASA. While there were several companies involved in the beginning, Rackspace dominated by sheer numbers. This dominance was a concern to many companies – why should they contribute their time and resources to a project that might only benefit Rackspace? This fear was not entirely unfounded, as the OpenStack API was initially created to match Rackspace’s legacy cloud API, and much of the early naming of things matched Rackspace’s terminology – I mean, who ever thought of referring to virtual machines as “servers”? But that matched the “Cloud Servers” branding that Rackspace used for its cloud offering, and that name, as well as the use of “flavor” for instance sizing, persist today. The early governance was democratic, but when one company has many more votes than the others…
The executives at Rackspace were aware of this concern, and quickly created the OpenStack Foundation, which would be an independent entity that would own the intellectual property, helping to guarantee that one commercial company would not control the destiny of OpenStack. More subtly, though, it also engendered a deep distrust of any sort of top-down control over the direction of the software development. Each project within OpenStack was free to pretty much do things however they wanted, as long as they remained within the bounds of the Four Opens: Open Source, Open Design, Open Development, and Open Community.
That sound pretty good, right? I mean, who needs someone imposing their opinions on you?
Well, it turns out that OpenStack needed that. For those who don’t know the term “BDFL“, it is an acronym for “Benevolent Dictator For Life”. It means that the software created under a BDFL is opinionated, but it is also consistently opinionated. A benevolent dictator listens to the various voices asking for features, or designing an API, and makes a decision based on the overall good of the project, and not on things like favoring corporate interests for big contributors, or strong personalities that otherwise dominate design discussions. Can you imagine what AWS would be like if each group within could just decide how they wanted to do things? The imposition of the design from above assures AWS that each of its projects can work easily with others.
The closest thing to that in OpenStack is the Technical Committee (TC), which “is an elected group that represents the contributors to the open source project, and has oversight on all technical matters”. Despite the typical meaning of “oversight”, the TC is essentially a suggestion body, and has no real enforcement power. They can spend months agonizing over the wording of mission statements and community goals, but shy away from anything that might appear to be a directive that others must do. I don’t think the word “must” is in their vocabulary.
They also bend over backwards to avoid potentially offending anyone. Here is one example from my interactions with them: one of the things the TC does is “tag” projects, so that newcomers to OpenStack can get a better idea how mature a particular project is, or how stable, etc. One of the proposed tags was to warn potential users that a project was primarily being developed by a single company; the concern is that all it would take is one manager at that company to decide to re-assign their employees, and the project would be dead. This is a very valid concern for open source projects, and it was proposed that a tag named “team:diverse-affiliation-danger” be created to flag such projects. What followed was much back-and-forth on the review of the proposal as well as in TC meetings about how the tag name was negative and would hurt people’s feelings, how it would be seen as an attack against a project, that it was more of a stick rather than a carrot, etc. All of this hand-wringing over an objective measurement of the content of a project’s current level of activity. (Epilogue: they ended up making it a positive-sounding tag: “team:single-vendor”, and no tears were shed)
Having ineffective leadership like the TC has ripple effects throughout all of OpenStack. Each project is an island, and calls its own shots. So when two projects need to interact, they both see it from the perspective of “how will this affect me?” instead of “how will this improve OpenStack?”. This results in protracted discussions about interfaces and who will do what thing in what order. And when I say “protracted”, I don’t just mean weeks or months; some, such as the Cyborg–Nova integration discussions, have dragged on for two years! I cannot imaging that happening in a world with an OpenStack BDFL. This inter-project friction slows down development of OpenStack as a whole, and in my opinion, contributes to developer dissatisfaction.
So what would OpenStack have been like if it had had a BDFL? Of course, that would depend entirely on the individual, but I can say this: it would have flamed out very quickly with a poor BDFL, or it would be a much better product with a much higher adoption with a good one. Back in 2013 I had predicted that OpenStack would eventually rival the commercial clouds in much the same manner that Linux now dominates the internet over proprietary operating systems. In the early days of the internet, the ability for people to download and play with free software such as the LAMP stack enabled people with big ideas but small budgets to turn those ideas into reality. OpenStack began in the early days of cloud computing, and it seemed logical that having a freely-available alternative to the commercial clouds might likewise result in new cloud-native creations becoming reality. It was a believable prediction, but I missed the effect that a lack of coordination from above would have on OpenStack achieving the potential to fill that role.
By the way, many people point to Linux and its BDFL, Linus Torvalds, as the argument against having a BDFL, as Linus has repeatedly behaved as an offensive ass towards others when he didn’t like their ideas. But ass or not, Linux succeeded because of having that single opinion consistently shaping its development. Most BDFLs, though, are not insufferable asses, and their projects are better off as a result.
Immediately following the Open Infrastructure Summit in Denver was the 3-day Project Teams Gathering (PTG). This was the first time that these two events were scheduled back-to-back. It was in response to some members of the community complaining that traveling to 4 separate events a year (2 Summits, 2 PTGs) was both too expensive and too tiring. The idea was that now you would only have to travel twice a year.
Now that I’ve experienced these back-to-back events, I think that this was a giant step backwards. Let me explain why.
First, it was exhausting! Being in rooms with lots of people for days on end is very draining for those of us who are introverts. Sure, we can be outgoing and interact with people, but it takes a toll, and downtime is necessary to recharge the psychological batteries. At several points I found myself faced with attending a session or finding an empty room to work on stuff by myself, and the latter often won out.
Second, the main idea of the PTG was to take the midcycle get-togethers that many teams had been doing, and formalize a single place for them to meet. The feeling was that having these teams in the same place would spur cross-project discussions, and that definitely was the case. But now that teams will only be getting together every 6 months, we’re back to the situation we were in before the PTGs were created: many teams will need a mid-cycle meeting to ensure that everyone is on-track to complete the goals for that release cycle.
Third, being away from home for an entire week is too long. OK, maybe I’m just getting old, but I really do like being home. One of the nice things about traveling to conferences is tacking on a few extra days to explore the area. For example, after last year’s PTG in Denver, my wife flew out to join me, and we spent a long weekend in Rocky Mountain National Park and other nearby natural areas. But after a solid week of stuff, I couldn’t wait to go home.
Fourth, many people time their return travel so that they miss the last day (or part of it). My unscientific observation was that attendance on the last day of this PTG showed a more dramatic drop than in previous PTGs. I think that’s because it doesn’t seem as severe to miss one day out of 6 than to miss one day out of 3.
As is the tradition at PTGs, there was a feedback session at lunch on the second day, and a lot of the feedback was in line with my observations. Of course, there were a lot of people who liked the format, and for the exact opposite reasons! Goes to show you can’t please everyone.
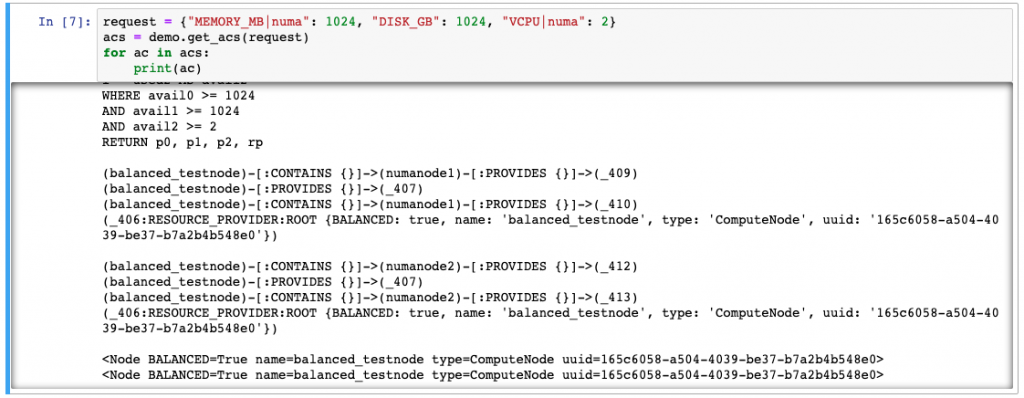
As for the sessions, the API-SIG was scheduled in a room for Thursday morning. I hung out there, and a few people did come in, but I think we had covered all of the outstanding issues at the BoF session on Tuesday. So I got to spend a lot of the morning hacking on Neo4j, and was able to implement a lot of the functionality that is missing in Placement: nested providers, shared providers, and quotas. I put together a series of Jupyter Notebooks that demonstrated all of these things working with just a small amount of code so that I could share with other people involved in Placement.
And then there was lunch! After 3 days of either going hungry or grabbing something nearby, it was so much nicer to sit down with people while eating lunch. Unfortunately, the box lunches provided seemed to have been kept at near-freezing temperatures until just before the lunch break, and almost too cold to eat. Still, I much preferred them to not having any lunch session at all, if for nothing else than being able to share a meal with other OpenStackers.
In the afternoon we had the Nova – Placement cross-project session, to which the Placement PTL, Chris Dent, brought some bottles of bubbly to celebrate the deletion of the Placement code base from Nova. That commit ended up getting delayed for one more day, but still, it was a milestone to celebrate.
The rest of the session was personally painful to sit through, as the topics revolved around the things that we have been fighting to implement for over 2.5 years: nested providers, shared providers, tree affinity, and other complex relationships among resources. It was painful because I just wanted to shout out “WE’RE USING THE WRONG TOOL!”, as these things naturally flowed from a graph database. I was able to get all of these things working in my spare time over the previous few days. I like to think that I’m a pretty smart guy, but I’m not THAT smart. It’s just because the tool fits the problem domain.
Jupyter notebook showing a section of the Nested Provider demo. It’s a little hard to see, but the two results show that there two possible solutions, both starting with the ComputeNode named ‘balanced_testnode’. Each solution shows that the requested resources both came from the same NUMA node. This is one of the things that comes naturally with a graph DB that is really, really hard in a SQL DB.
I spent that evening working to finish up my Neo4j examples, as I had asked several key placement contributors to take a few minutes to sit down with me so that I could show them what I had done. On Friday morning I showed my graph work to several people, and while each reaction was different, there was a definite flow from skepticism to curiosity and then (for some) to agreement. One of the people to whom I especially wanted to show this was Jay Pipes, whom I had mentioned in my earlier experiments with graph DBs. He had already seen the potential after those blog posts, but he was concerned with developers having to learn some new, cryptic language in order to implement this. However, after about 10 minutes of my demos, I showed him the query I was currently working on that wasn’t quite right. He looked it over, made a suggestion, and when I ran it, it worked correctly! So I think that if he could get a working knowledge after just 10 minutes of seeing the Cypher Query Language, it won’t be hard for other devs to pick it up.
Later in the day we had a good discussion with the Ironic team about a need that they had for stand-alone (i.e, not running under Nova). In such situations, they wanted to use the full resource amounts in placement, as opposed to the current approach used in Nova, which is to represent an Ironic node as an inventory of 1 thing. The issue with representing a baremetal server as, say, 500GB of disk and 16 CPUs is that it may occasionally be selected from a request for 250GB and 8CPU. Since each server cannot be shared, we needed to figure out a way to fully consume the resources on the machine when it was selected, even if the request was for a lower amount. Several ideas were floated and discussed, all with varying degrees of messiness. We finally settled on adding a new API endpoint that would accept a Resource Provider, and allocate all of its resources so that it would no longer be available to any other request.
Hallway Sign
On Saturday morning we started with the Cyborg-Nova cross-project session, at which we could finally see a demonstration of Cyborg in action! I had thought that the Summit sessions would have been much more useful if the demo had been shown then, so that we could have something concrete to discuss. I was glad to see that Cyborg is working and handling accelerators after a few years of planning and design, and I look forward to making further progress integrating it with Nova and Placement.
There were a few discussions in the afternoon that had to do with representing nested resources and their relationships. Once again, it was difficult to listen to these attempts to represent complex relationships in a SQL DB, when I had just demonstrated how simple it was in a graph DB. It was indeed telling that the subject was entitled “Implementing Nested Magic” – getting this working in SQL does seem to require supernatural powers!
I had to leave around 3pm to get to the airport, so I missed anything after that. But most people seemed to have left by then anyway. It had been a long week, and I was burnt out. I also missed being home with my wife, sleeping in my own bed, working at my own desk, and eating my own food. I sincerely hope that the Foundation reconsiders this back-to-back setup. I realize that they are trying to save money wherever possible, but this just wasn’t worth it.